We are continually adding enhancements and new features to Project Center. Over the past month, we’ve added a number of new features to the platform. Read on to learn more about how to:
- Cancel Workflow Items in Bulk
- Full-Screen Task UI Builder with Collapsible Side Rail
- Invite Freelancers to OneSpace Direct
- Edit Inputs & Outputs Post-Launch
- Use Columns to Display Checkboxes & Radio Lists
- Click to View a Full-Sized Image
- Copy Your Task UI From One Step to the Next
- Copy Your Instructions From One Step to the Next
- Edit Inputs & Outputs Post-Launch
Cancel Workflow Items in Bulk
April 20, 2017
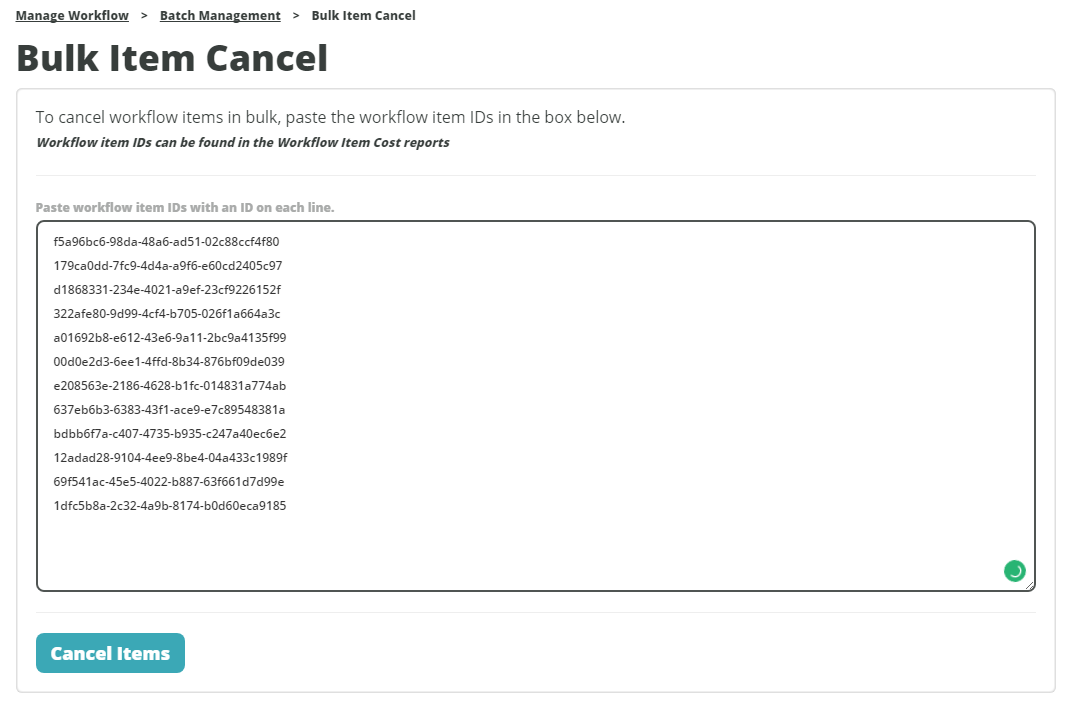
Bulk Item Canceling allows you to cancel workflow items in bulk by copying and pasting a list of workflow item IDs into the Bulk Item Cancel tool (shown below). Previously we allowed you to cancel individual items one at a time, or cancel an entire batch at once. Now you can cancel multiple specific workflow items all at the same time using this feature.
Velocity reports such as the Workflow Item Aging report or Flagged Workflow Items report can help you determine workflow items that need to be canceled. Remember, canceling a workflow item will remove it from the work queue, making it unavailable for contributors to work on. Learn more about canceling workflow items.
Access this feature on the batch management page for any workflow. From there you can cancel items for that workflow or any other workflow for your company.
Full-Screen Task UI Builder with Collapsible Side Rail
April 14, 2017
We’ve optimized your view and now take up the full screen when you are working in the Task UI Builder. This will be even more impactful in the future when you have access to the other exciting new features we have coming in the future for the Task UI Builder. Learn more about how to use the Task UI Builder.
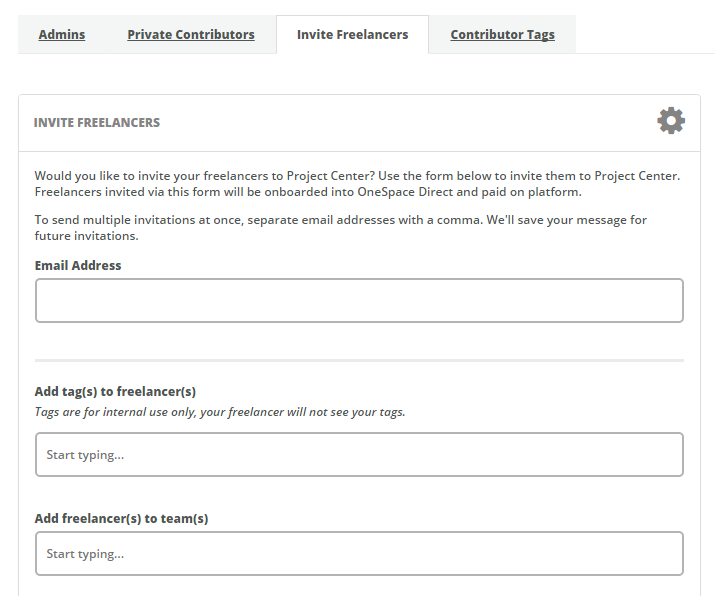
Invite Freelancers to OneSpace Direct
April 6, 2017
You can now invite contributors to join your teams as a part of the OneSpace Direct labor channel. These contributors will be paid on the platform and will not use one of your Private Contributor seats.
Select this method when you want to add freelancers to your team but don’t need them to be exclusive to your company.
When you send these invitations you will have the option to automatically assign teams and tags to the contributor. Once they sign up on WorkStation they will have immediate access to any relevant work according to their teams and qualifications.
Access this feature via the Company Settings section and select the Invite Freelancers tab.
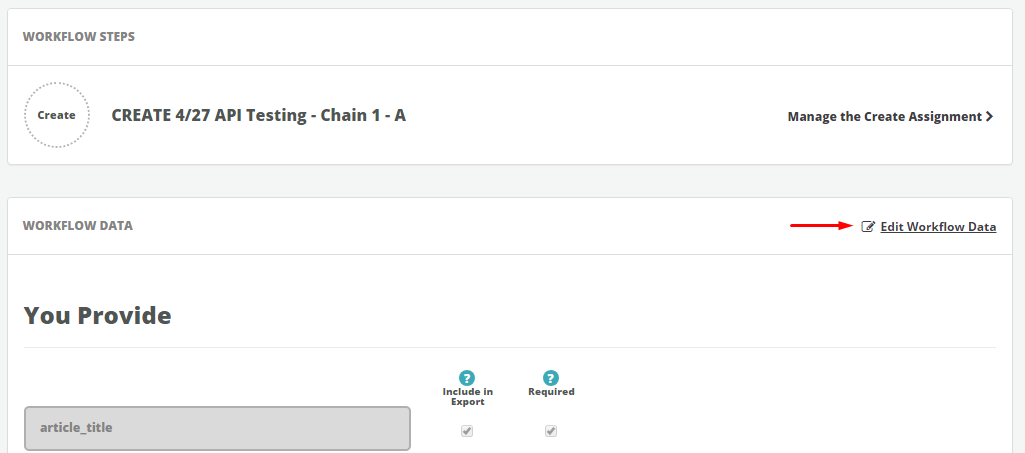
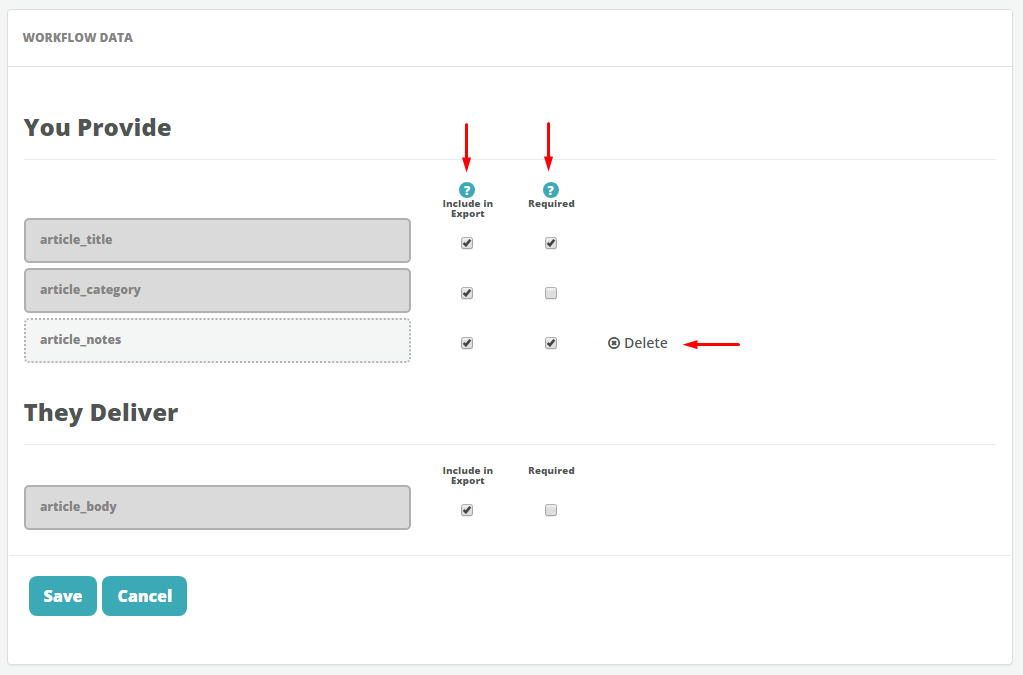
Edit Inputs & Outputs Post-Launch
April 5, 2017
Improve existing workflows by updating your export settings or removing unused inputs on a previously-launched workflow. This feature is only available when the workflow does not have any open items in it. If there are active workflow items, you will have to either wait for those items to be fully completed or you can choose to cancel the remaining items.
Access this feature by clicking “Edit Workflow Data” in the upper right corner of the Workflow Data section on the Manage Workflow page. From here you can remove unused inputs, change whether or not inputs are required, and update the export settings for future batches.
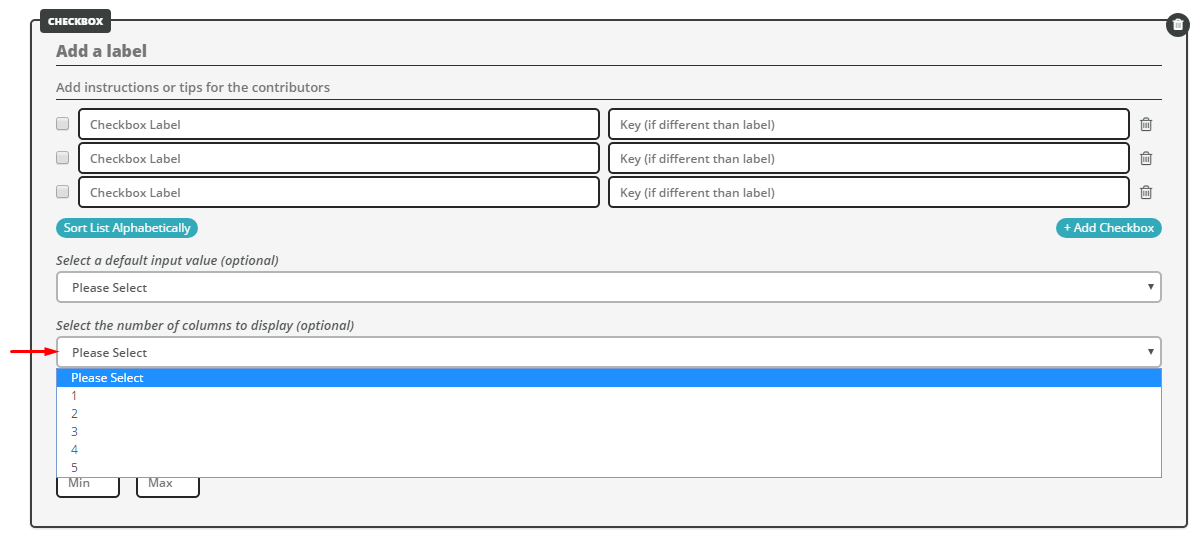
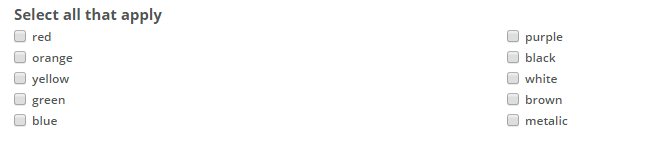
Use Columns to Display Checkboxes & Radio Lists
March 30, 2017
Previously, when using radio list and checkbox lists on the Task UI, the list of options was always limited to a single column. Now we are providing more flexibility by allowing you to display these options in up to five columns. When adding a checkbox or radio list collect element to your Task UI, use the dropdown to select the number of columns you would like to display. This will automatically divide the checkbox and radio list options into up to five columns.
Access this feature for checkboxes and radio lists in the Task UI Builder during Assignment Setup.
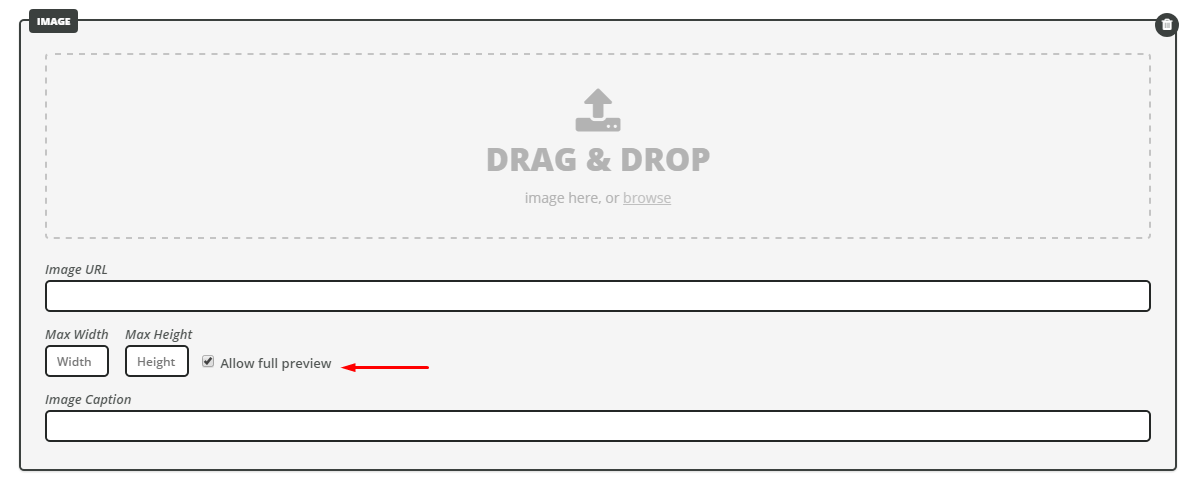
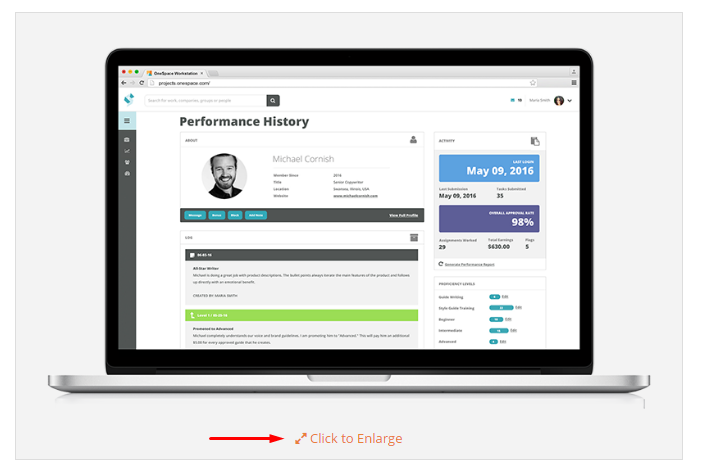
Click to View a Full-Sized Image
March 23, 2017
Give your contributors access to view larger images by displaying an auto-generated link to the full-sized version of each image in the Task UI. When adding an image display element to your Task UI, use the “Allow full preview” checkbox to include a “Click to Enlarge” link to contributors when they work on the associated assignment in WorkStation.
Access this feature for the image display element in the Task UI Builder during Assignment Setup.
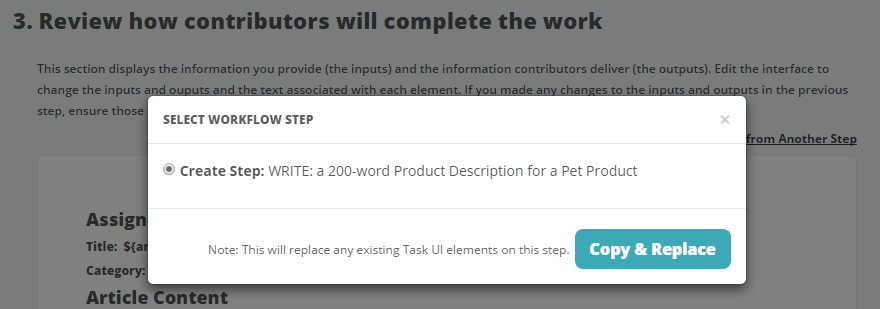
Copy Your Task UI From One Step to the Next
March 9, 2017
We’ve made it easier for you to set up multi-step workflows with a new feature for reusing pre-set elements from a prior step in your workflow. Simply set up your Task UI once and then use the Copy Task UI feature to copy it to subsequent steps. This will replace the existing content on that step with the selected settings. The tool will automatically update the output names so they meet our validation standards. Then, you can make changes and updates the Task UI and output schema as necessary to meet your needs. Learn more about how to use the Task UI Builder.
Access this feature on the Design section during Assignment Setup. From there, click "Copy Task UI Elements from Another Step" and select the appropriate workflow step.

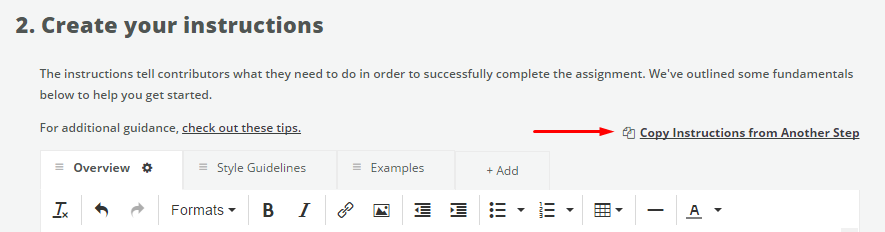
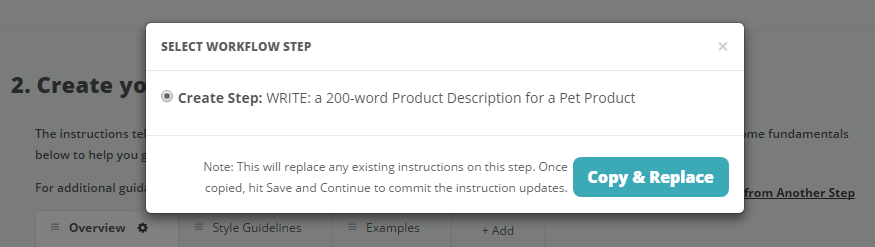
Copy Your Instructions From One Step to the Next
March 9, 2017
Similarly, you can now save time by writing your instructions once and then using the Copy Instructions feature to reuse them again on subsequent steps within the workflow. The tool will automatically update all tabs of the instructions with the content from the selected step. Then, just make any remaining edits as needed - remember, the Overview tab will likely need slightly different step-by-step instructions for each step in your workflow.
This feature can be particularly helpful for projects with multiple tabs or detailed specifications, such as a complex Style Guide, that are the same from step-to-step. Learn more about creating effective instructions.
Access this feature on the Design section during Assignment Setup. From there, click "Copy Instructions from Another Step" and select the appropriate workflow step.