
A workflow chain is a collection of two or more workflows that have been linked together. Workflow chains are a powerful automation tool, allowing you to get your work done faster with minimal manual intervention.
- Validating Workflow Setup
- Creating a Workflow Chain
- Building your Chain
- Mapping the Data
- Advanced Rules
- Formatting Your Chain
- Editing Your Chain
- Launching Your Chain
Validating Workflow Setup
Before you can create a workflow chain you need to have or set up a project that contains multiple workflows. We recommend that you set up a workflow all the way through to the launch page before adding it to a chain. This will ensure that you have complete workflow data (inputs and outputs) set up before you begin mapping your chain. To create a new workflow, go to the Workflows page on Project Center and click the "Create a workflow" button to being the workflow setup process.
Workflows without workflow data cannot be connected to a chain. There are two ways you can determine if your workflows are setup up properly to allow them to be used in a workflow chain.
—Via the Workflows Page
The primary location to evaluate your workflows is on the Workflows page. Navigate to the Workflows page from the link in the side rail. On this page you will get a complete list of all of your workflows across all statuses. In the filter rail, you can select filters to narrow down the workflow list to isolate the workflows you would like to check. You can select from the Projects filter to display only workflows in a specific project and then evaluate the status of each workflow in the list. A workflow can be used in a workflow chain if it has the status of "Active" or "Inactive". Either of those statuses signify that the workflow has the required workflow data to be used. In general, it is always good practice to review the setup of any workflows you add to a chain.
Any workflows that have a status of "Draft" do not have workflow data, and cannot be added to a workflow chain. You will need to finish setup before adding these to a workflow chain. To create a workflow from this page, just click on the "Create a workflow" button in the top right corner.

Via the Projects Page
Navigate to the Projects page and find the project you are working on. Expand the details section. Workflows that are active are displayed in green and have complete workflow data. Workflows that say “Resume Setup” have workflow data. You should still check these workflows to ensure they have been completely set up. Workflows that say “Set Up” do not have workflow data, and cannot be added to a workflow chain. You will need to finish setup before adding these to a workflow chain. You can also click “Add Workflow” to create new workflows from this page.
Creating a Workflow Chain
Once you have finished setting up all of your workflows, you can create a workflow chain. There are two ways you can get started. From the My Projects page, with the details section expanded, you can click on “Add chain.” This will jump you straight to the Workflow Chains page.
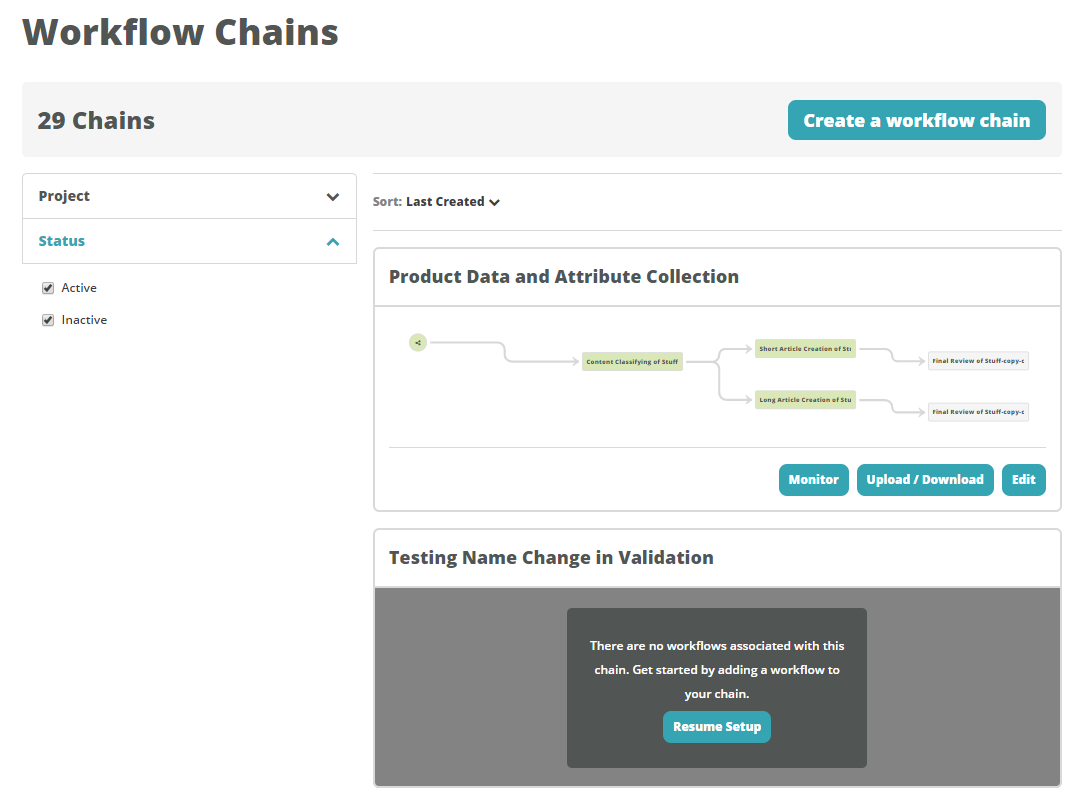
You can also access the Workflow Chains page via the left-hand rail navigation. After you click on the Workflow Chains, you will see a list of all of the existing workflow chains in your account. If you have not created one yet, we will prompt you on how to get started. You can also quickly create a new chain by clicking on the “Create a Workflow Chain” button in the top right corner of the page. We automatically create a name for the workflow chain, but you can edit this name at any time. We recommend you update the name to something more specific by simply clicking the "Edit" link next to the name.
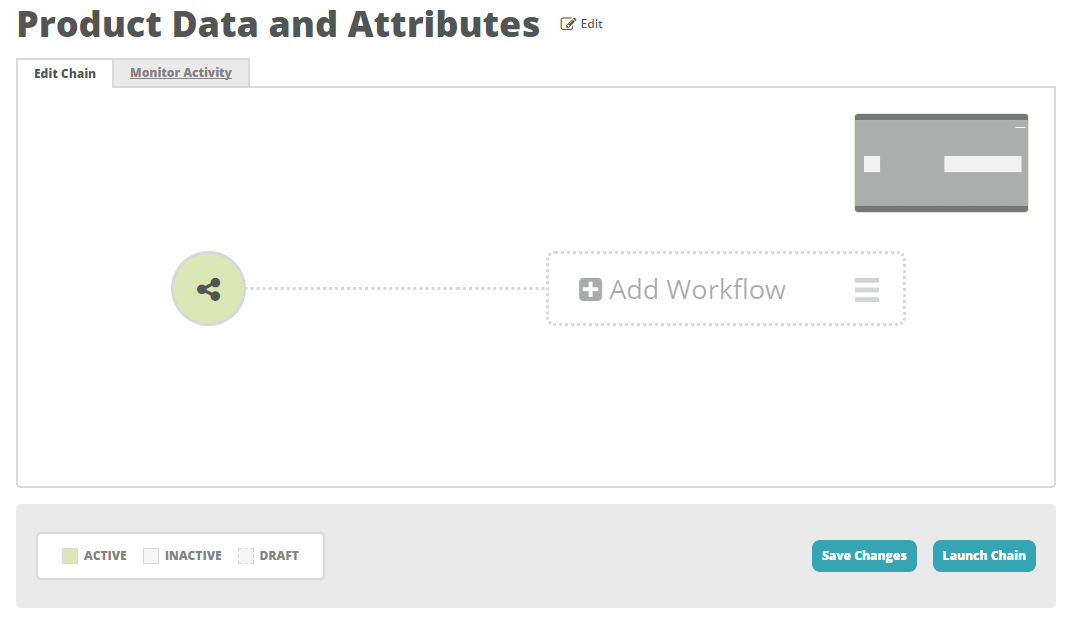
Building Your Chain
Once you have created your chain, you will see a canvas with a button to “Add Workflow”, clicking this will provide you with a list of available workflows to add to your chain.
START BUILDING YOUR CHAIN:
Once you select a workflow, it will display on the chain canvas and you will be presented with two options to continue to build your chain.
- To connect another workflow directly to the beginning of the chain, click the "Add Workflow" button. This will allow you to utilize advanced rules directly from import to route work to the appropriate workflows from the beginning.
- To continue to build along a path, click “Connect” to add the next workflow on a specific path.
For more about how to structure your chains, refer to the Workflow Chains: The Basics.
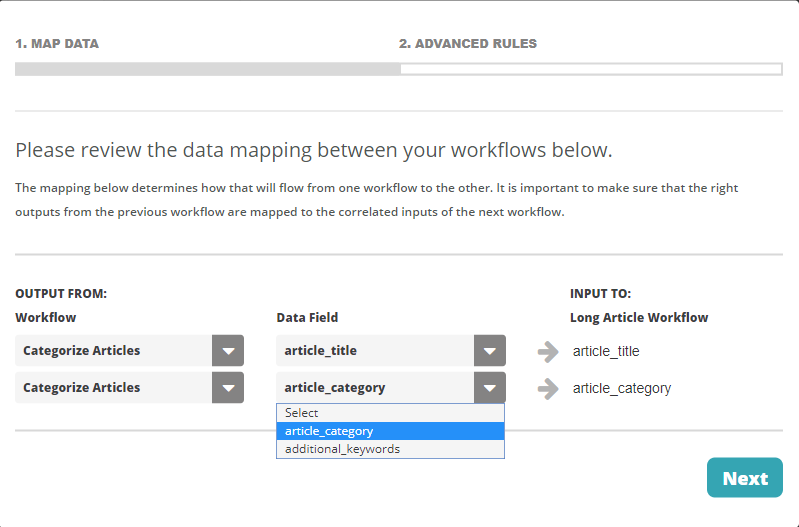
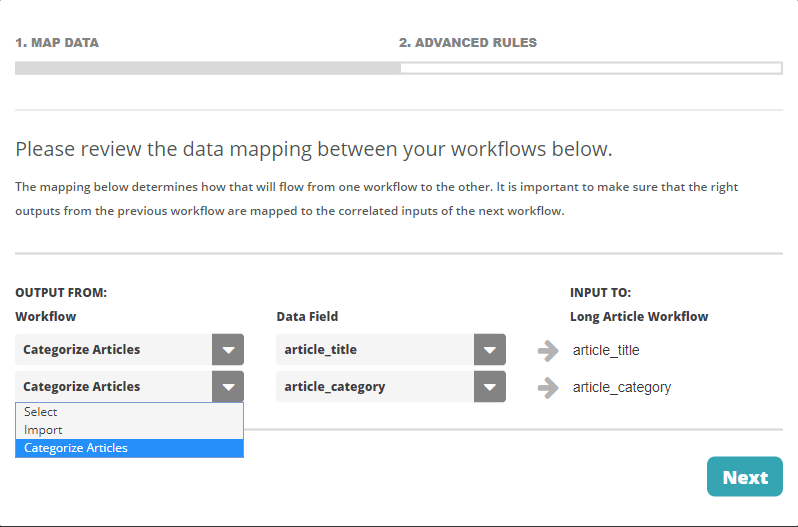
—Mapping the Data
When you add a second workflow, you will be prompted to map the data between the two workflows. Outputs from the first workflow can be used as inputs in the second workflow, allowing information to be carried through from one workflow to the next. You must provide a mapping for each input included in your second workflow. For example, you will likely want your "article_category" output from a Categorize Article workflow to be carried through as an input on an Long Article Creation workflow.
After you have finished mapping your data, click "Next" to continue.
MAPPING YOUR DATA:
Mapping from Import or Across Workflows
There are some scenarios where the data you need is provided in a workflow several steps back in your chain. Or there are many cases where you may not need a piece of data until your third or fourth workflow into the chain. For these instances we allow you to pull data from any previous workflow on the chain's path, even directly from import. To utilize this feature, simply select the workflow you would like to pull data from in the first dropdown of your mapping screen to get the list of available outputs to map. There is also an "Import" option in the dropdown. When selecting this, you can actually pull data that was provided on import to any workflow in the chain.
PASSING DATA THROUGH YOUR CHAIN:
Advanced Rules
When you click "Next," you will be asked: “Would you like to apply rule(s) to this connection?” Select "No" if you want all work to flow in a straight path from one step to the next. This means no special rules will be applied to route work from one workflow to another.
For example, connect a Title Creation workflow to an Article Creation workflow and then to an Image Selection workflow to get a complete article with all the components you need to add it to your website.

Branching
You can also set up more complex chains that branch based on specific rules. In order to create a branch, select "Yes" to apply an advanced rule. For example, maybe you want to separate your articles based on word count, into short articles, medium articles and long articles. This can be useful in order to control costs, as you may want to pay more for a long article than a short article. You can do this by setting a rule that if the article format contains “short” to send it to the Article Short Workflow, and similar rules for medium and long articles.
When setting up rules, make sure they are exclusive and precise. For example, if you also have an article format for “expert articles” but do not provide a mapping for this, expert articles will not proceed through the chain.
SETTING UP LOGIC RULES:
Saving
After you have finished setting up your chain, click "Save Changes" in the lower right. If you navigate away from the page without saving, your changes will be lost. Formatting Your Chain
When you build a workflow chain, the connections will appear in a logical order. If would like to rearrange the display, click on the three horizontal lines to the right of your workflow name. This will allow you to drag that item in your workflow chain to a new position.
You can zoom in or out of your workflow chain canvas by scrolling in or out with your mouse. You can also drag the entire chain by clicking anywhere on the canvas.
To save your chain with the new format, click "Save Changes" in the lower right.
Editing Your Chain
In order to edit your workflow chain, click “Edit Workflow Chain” or simply click inside the chain canvas. To edit one of the connections within your chain, click on the three dots within each connection. From here, you can edit your data mapping or advanced rules.
After you have made edits, make sure you save your changes by clicking "Save Changes" in the lower right. Note: You cannot make edits to a workflow chain that has active work. Read more about releasing work to your workflow chain.
Launching Your Chain
Once you have finished setting up your workflow chain, it is time to launch the chain. Launching the chain will launch all workflows within the chain, and allow you to release work to contributors. For more information on launching a chain, refer to Launching a Workflow Chain.